LED Blinky
In this project, we change intensity of an LED at intervals of time by which we can see a twinkling effect.
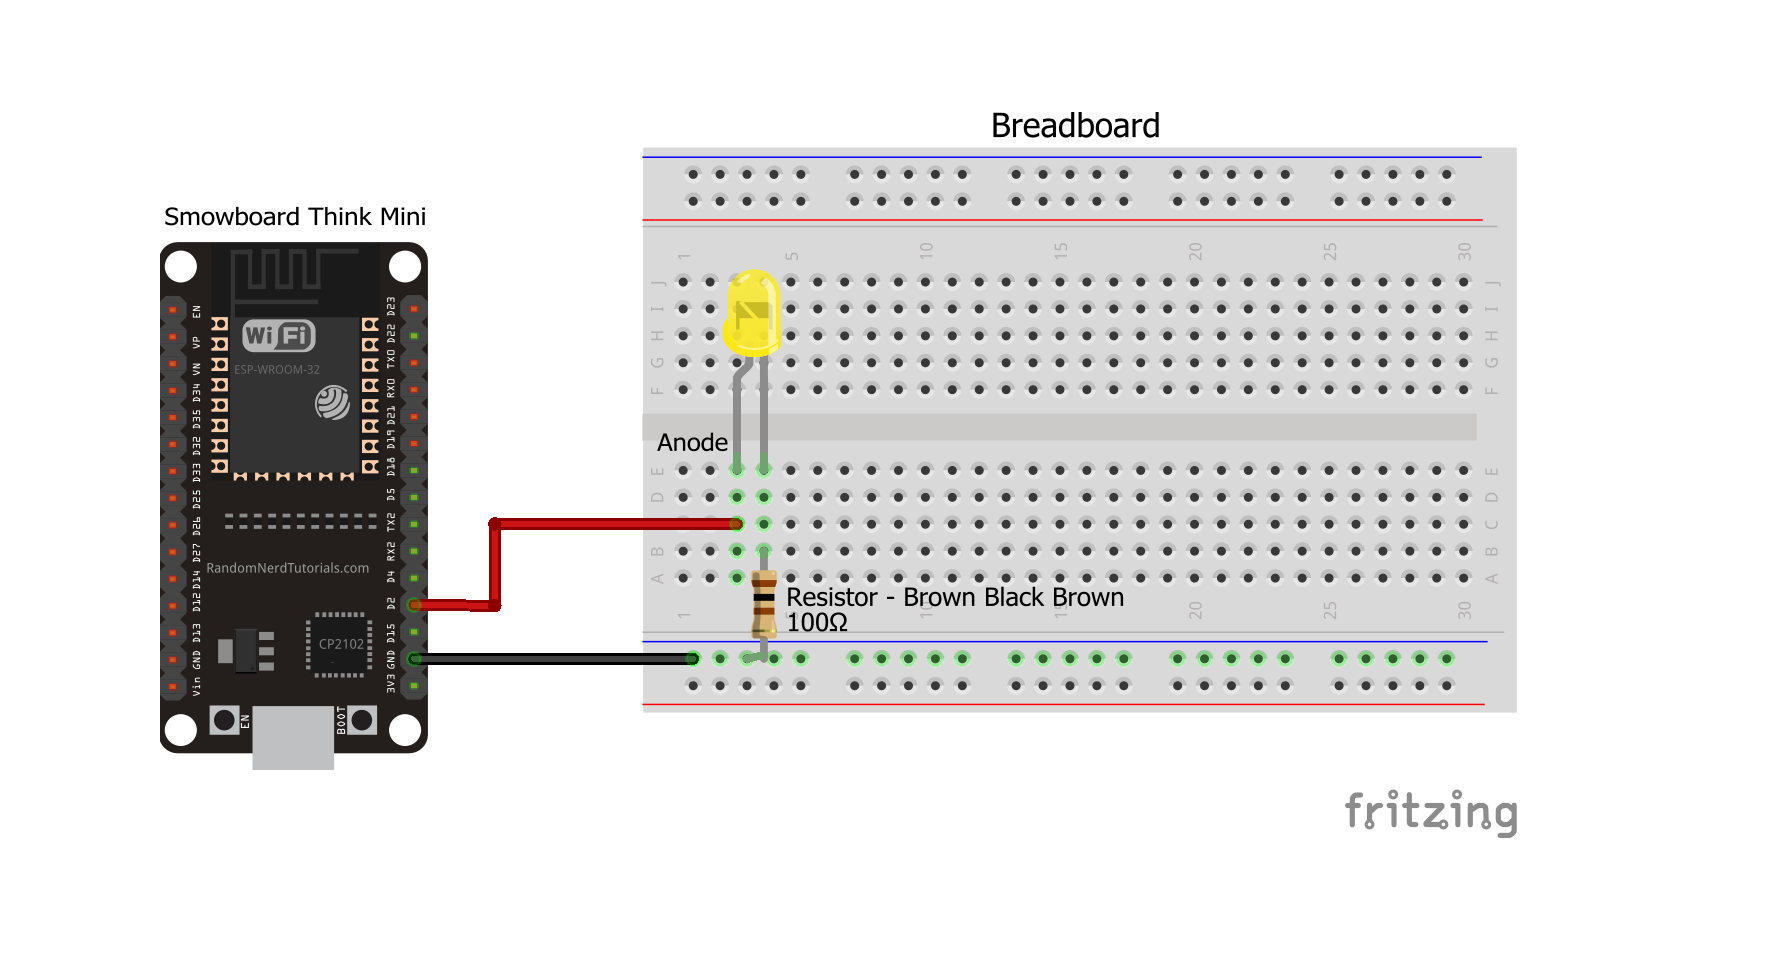
Circuit
Components
- 1 Smowboard Think Mini
- 2 male-to-female jumper wires
- 1 LED (any colour)
- 1 100 Ohm Resistor
In the circuit, we use an LED that emits light when voltage is applied across it. The cathode pin of the LED is grounded by connecting it to the ground pin of Smowboard. To limit the flow of current in the LED, a 100 ohm resistor is connected in series with the LED on the cathode side. The voltage across the LED is controlled by connecting its anode to the pin number 2 of Smowboard. Smowboard then smartly varies the voltage on its pin 2, with respect to ground, based on the code written using Smowcode for it.
When a current will pass through the LED, the LED will glow. As the voltage across the LED is varied by Smowboard, the current will also vary due to which the LED will glow at different intensities.
Project 1: Blinking LED
Flow

[{"id":"cc7bf0f0.b90f7","type":"tab","label":"Flow 1","disabled":false,"info":""},{"id":"e723a011.77b4e","type":"common/on interval","z":"cc7bf0f0.b90f7","config_props":{"name":"","interval":"1"},"outputProps":{},"dependency_set":{},"x":100,"y":200,"wires":[["c258d907.52d548"]]},{"id":"c258d907.52d548","type":"smow_pin/write","z":"cc7bf0f0.b90f7","config_props":{"name":"","pin_number":"2","level":"1"},"outputProps":{},"dependency_set":{},"x":270,"y":200,"wires":[["b14707ac.2afd08"]]},{"id":"b14707ac.2afd08","type":"common/delay","z":"cc7bf0f0.b90f7","config_props":{"name":"","period":"1"},"outputProps":{},"dependency_set":{},"x":440,"y":200,"wires":[["309df6dc.1c3fda"]]},{"id":"309df6dc.1c3fda","type":"smow_pin/write","z":"cc7bf0f0.b90f7","config_props":{"name":"","pin_number":"2","level":"0"},"outputProps":{},"dependency_set":{},"x":610,"y":200,"wires":[["366549d5.d25b46"]]},{"id":"366549d5.d25b46","type":"common/delay","z":"cc7bf0f0.b90f7","config_props":{"name":"","period":"1"},"outputProps":{},"dependency_set":{},"x":780,"y":200,"wires":[[]]}]
To import this code to the Studio , copy it and paste it into the import nodes dialog box in the import section.
Let's understand the code,
- The flow starts with an
on intervalnode. All next nodes connected to it get triggered repeatedly after the specified interval of time. - Double click on the node to change its properties.
- We set the time interval of the
on-intervalnode to 1 second. - We now connect a
pin writenode. We set it's 'Pin Number' as 2 and 'Pin Level' as 1 to glow the LED. - After that, a delay node is used to add a delay of 1 second before the of next node,
pin writeruns. - This delay keeps the LED glowing for 1 second.
- Then, we use another
pin writenode and set its 'Pin Number' as 2 and 'Pin Level' to 0. This will turn OFF the LED. - After that, another
delaynode is used to add a delay of 1 seconds. The flow doesn't restart before this node's activity (i.e. delay) finishes. - This delay keeps the LED OFF for 1 seconds.
- Now, we upload the code to the Smowboard using the
uploadbutton on the Studio. - We can see the LED blinking as it turns ON and OFF every 1 second.
Output

Project 2: Twinkling LED
Flow

[{"id":"d79b71cf.073df","type":"tab","label":"Flow 1","disabled":false,"info":""},{"id":"342b00dd.0c492","type":"common/on interval","z":"d79b71cf.073df","config_props":{"name":"","interval":"1"},"outputProps":{},"dependency_set":{},"x":180,"y":180,"wires":[["61c9780c.408068"]]},{"id":"61c9780c.408068","type":"smow_pulse/analog write","z":"d79b71cf.073df","config_props":{"name":"","config":"a884d4df.c193a8","duty_cycle":"35","frequency":"1000","h_point":"0"},"outputProps":{},"dependency_set":{},"x":360,"y":180,"wires":[["89add30b.32d45"]]},{"id":"89add30b.32d45","type":"common/delay","z":"d79b71cf.073df","config_props":{"name":"","period":"1"},"outputProps":{},"dependency_set":{},"x":540,"y":180,"wires":[["abcccc9f.0b364"]]},{"id":"abcccc9f.0b364","type":"smow_pulse/analog write","z":"d79b71cf.073df","config_props":{"name":"","config":"a884d4df.c193a8","duty_cycle":"100","frequency":"1000","h_point":"0"},"outputProps":{},"dependency_set":{},"x":720,"y":180,"wires":[["50ab81ae.b6ca6"]]},{"id":"50ab81ae.b6ca6","type":"common/delay","z":"d79b71cf.073df","config_props":{"name":"","period":"0.01"},"outputProps":{},"dependency_set":{},"x":910,"y":180,"wires":[[]]},{"id":"a884d4df.c193a8","type":"smow_pulse/analog write config","z":"","config_props":{"name":"","pin":"2","duty_resolution":"11","timer_num":"0","led_channel":"0","clk_config":"0","speed_mode":"0"},"outputProps":{},"dependency_set":{}}]
To import this code to the Studio , copy it and paste it into the import nodes dialog box in the import section.
Let's understand the code,
- The flow starts with an
on intervalnode. All next nodes connected to it get triggered repeatedly after the specified interval of time. - Double click on the node to change its properties.
- We set the time interval of the
on-intervalnode to 1 second. - We then use an
analog writenode to glow the LED and to set its intensity to 35%. - We configure the
analog writenode by clicking on the pencil icon on the output property ofanalog writenode. We set the pin number as 2. We then click onAddanddonebutton to complete the configuration. - After that, a delay node is used to add a delay of 1 second before the of next node,
analog writeruns. - This delay keeps the LED glowing at low intensity (35%) for 1 second.
- Then we use another
analog writenode and set intensity of the LED to 100%. - We configure this
analog writenode by clicking on the pencil icon on the output property ofanalog writenode. We set the pin number as 2. We then click onAddanddonebutton to complete the configuration. - After that, another
delaynode is used to add a delay of 0.01 seconds. The flow doesn't restart before this node's activity (i.e. delay) finishes. - This delay keeps the LED glowing at full intensity(100%) for 0.01 seconds.
- Now, we upload the code to the Smowboard using the
uploadbutton on the Studio. - We can see the twinkling effect as the LED remains glows dim (35% intensity) for 1 second and then turns bright(100% intensity) for a short 0.01 second time.
Output
Learn Coding and Electronics easily using Smowcode.