Hello World on LCD
In this project, we print and blink text on the LCD screen.
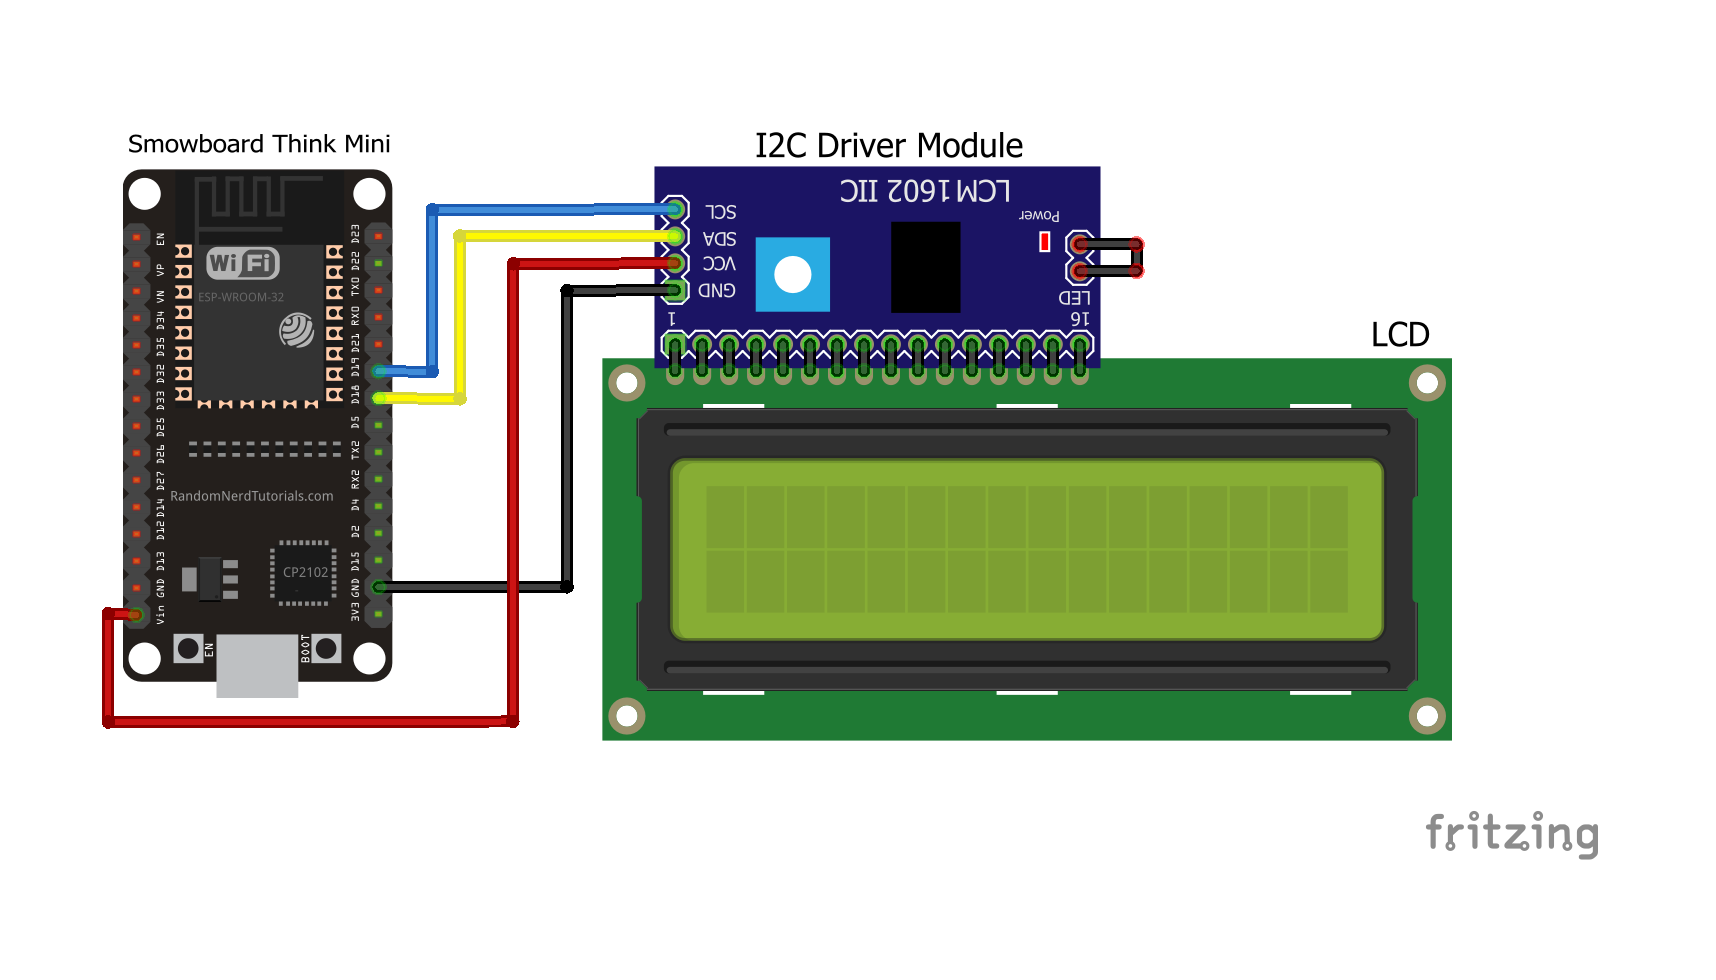
Circuit
Components
- 1 Smowboard Think Mini
- 1 LCD Display
- 4 female-to-female jumper wires
- 1 small screw driver
In this circuit, we have grounded the LCD by connecting it to the ground pin of Smowboard. The LCD is given a power supply by connecting its Vcc pin to the Vin pin of Smowboard. The SDA(Serial Data) pin of LCD is connected the pin number 18 of Smowboard for transfer of data between the two. The SCL(Serial Clock) pin of LCD which carries the clock signal is connected to the pin number 19 of Smowboard. Once the LCD is powered ON, we use a small screw driver for rotating the screw behind the LCD, to obtain distinct blocks on the screen.
The text which we want to display using the LCD is recieved by the SDA(Serial Data) pin. Once the text is recieved by the SDA pin, it will be displayed on the LCD screen.
Project1: Blink a text !
Flow

[{"id":"9fd8f881.c03c18","type":"tab","label":"Flow 1","disabled":false,"info":""},{"id":"7a08bb9f.8fc5b4","type":"common/on interval","z":"9fd8f881.c03c18","config_props":{"name":"","interval":"2"},"outputProps":{},"dependency_set":{},"x":160,"y":180,"wires":[["af9f97ff.d855d8"]]},{"id":"af9f97ff.d855d8","type":"smow_lcd/lcd clear","z":"9fd8f881.c03c18","config_props":{"name":"","i2c_config":"e1ed4617.521318"},"outputProps":{},"dependency_set":{},"x":330,"y":180,"wires":[["20136d7c.2267c2"]]},{"id":"20136d7c.2267c2","type":"common/delay","z":"9fd8f881.c03c18","config_props":{"name":"","period":"1"},"outputProps":{},"dependency_set":{},"x":500,"y":180,"wires":[["1443da0d.e62b76"]]},{"id":"1443da0d.e62b76","type":"smow_lcd/lcd print","z":"9fd8f881.c03c18","config_props":{"name":"","i2c_config":"e1ed4617.521318","x":"0","y":"0","text":"\"Hello World\""},"outputProps":{},"dependency_set":{},"x":710,"y":180,"wires":[[]]},{"id":"e1ed4617.521318","type":"smow_lcd/lcd port","z":"","config_props":{"name":"","i2c_port":"0","scl_pin":"19","sda_pin":"18","lcd_rows":"2","lcd_columns":"16","sda_pullup_en":"false","scl_pullup_en":"false","lcd_address":"39","i2c_clock":"100000","lcd_memory_columns":"32"},"outputProps":{},"dependency_set":{}}]
To import this code to the studio, copy it and paste it into the import nodes dialog box in the import section.
Lets understand the code,
- The flow starts with an
on intervalnode. All next nodes connected to it get triggered repeatedly after the specified interval of time. - Double click on the node to change its properties.
- We set the time interval of the
on-intervalnode to 2 seconds. - We use a
LCD clearnode to clear the LCD screen. - We configure the
LCD clearnode by clicking on the pencil icon on the 'LCD port' property of the it. We set the SCL pin to 19 and SDA pin to 18. We then click onAddanddoneto complete the configuration. - The LCD screen is cleared every 2 seconds as the time interval of
on eventnode is set as 2 seconds. - We then connect a
delaynode to add a delay of 1 sec before the next node,LCD printruns. - This delay prints the text after every 1 second.
- We use a
LCD printnode to print the text on the LCD screen. We enter the text to be displayed in the 'Text' property of theLCD printnode. - Now, we upload the code to the Smowboard using the
uploadbutton on the Studio. - We can see the text blinking as the
LCD clearnode clears the screen every 2 seconds, while theLCD printnode prints the text every 1 second.
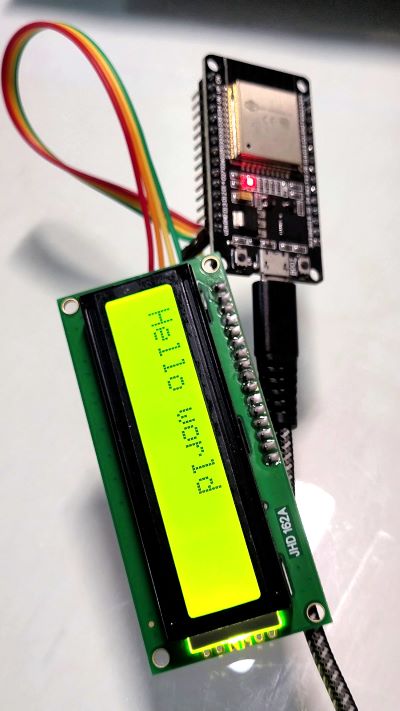
Output
Project2: Print user entered text
Flow

[{"id":"4288f2c7.ff862c","type":"tab","label":"Flow 1","disabled":false,"info":""},{"id":"7ba54039.08c2a","type":"smow_serial/on receive","z":"4288f2c7.ff862c","config_props":{"name":"","uart_port":"39a246b2.1b828a","mode":"2","user_len":"20","termination_char":"\"\n\"","clip_pattern":"true"},"outputProps":{},"outputs":[{"variables":[{"name":"data","value":"data"}]}],"dependency_set":{"wait_for_len":false,"wait_for_char":true},"x":180,"y":200,"wires":[["baff32ab.7fc8a"]]},{"id":"baff32ab.7fc8a","type":"smow_lcd/lcd clear","z":"4288f2c7.ff862c","config_props":{"name":"","i2c_config":"4ce95df9.dec564"},"outputProps":{},"dependency_set":{},"x":370,"y":200,"wires":[["8e247740.aa43e8"]]},{"id":"8e247740.aa43e8","type":"smow_lcd/lcd print","z":"4288f2c7.ff862c","config_props":{"name":"","i2c_config":"4ce95df9.dec564","x":"0","y":"0","text":"data"},"outputProps":{},"dependency_set":{},"x":540,"y":200,"wires":[[]]},{"id":"39a246b2.1b828a","type":"smow_serial/serial port","z":"","config_props":{"name":"","uart_port":"0","baud_rate":"115200","tx_pin":"1","rx_pin":"3","rx_control_buffer_size":"256","word_length":"3","parity_config":"0","stop_bits":"0","flow_ctrl_mode":"0"},"outputProps":{},"dependency_set":{"uart0":true,"uartX":false}},{"id":"4ce95df9.dec564","type":"smow_lcd/lcd port","z":"","config_props":{"name":"","i2c_port":"0","scl_pin":"19","sda_pin":"18","lcd_rows":"2","lcd_columns":"16","sda_pullup_en":"false","scl_pullup_en":"false","lcd_address":"39","i2c_clock":"100000","lcd_memory_columns":"32"},"outputProps":{},"dependency_set":{}}]
To import this code to the studio, copy it and paste it into the import nodes dialog box in the import section.
Lets understand the code,
- We start the flow with an
on-recievenode which gets triggered when Smowboard recieves serial data from the computer. Theon-recievenode passes the serial data to the next nodes. - We configure the
on-recievenode by clicking on the pencil icon on the serial ports property of it. We set the port no. to 'uart0' and the TX and RX pins as 1 and 3 respectively. - We then use a
LCD clearnode to clear the screen of LCD. - We connect a
LCD printnode to print the text on the LCD screen. In the text property of theLCD printnode, we select 'data' which is the output of theon-recievenode. - We now click on the
serial displaybutton and enter the text that is to be printed on the LCD screen. - We click on the
sendbutton to send the text(serial data) to the Smowboard. - Now, we upload the code to the Smowboard using the
uploadbutton on the Studio. - When the Smowboard recieves the text from computer, the
on-recievenode gets triggered and we can see the text being printed on the LCD screen.
Output
Learn Coding and Electronics easily using Smowcode.